JRtransition is a Shotcut Video Filter that produces a nice transition between video clips. This filter has been developed from an original idea of Shotcut Forum member "jonray". It is especially useful as a transition between slides of a slideshow. There are various ways to use this filter which are described below.
| Name | Description |
|---|---|
| Framerate | The framerate of the exported video, input as the number frames per second. You must specify this correctly if you use "seconds" as your units for 'duration"; if you use a "negative percentage" value for "duration" instead the framerate value is not used. |
| Delay | The amount of time to delay before the transition starts. The delay can be
specified in one of two ways, either as a negative percentage or as a value.
|
| Duration | The amount of time taken to perform the transition. Again as a negative percentage or a value |
| Angle | The angle (between -60° and 60°) at which the transition slopes. |
| Direction | The direction (top, right, bottom, left) from which the transition starts. |
| Main color | The colour of the wide stripe. |
| Stripe color | The colour of the thin stripe. |
| Chroma | When selected, the effect is an animated chroma key (or greenscreen) that matches the timing of the thin stripe. |
| Reverse | When selected the Chroma key or Mask are reversed e.g. instead of the chroma color appearing and travelling across the screen, it already exists on the screen and disappears as it travels across the screen |
| Mask | When selected, the effect is an animated (black and white) matte or mask that matches the timing of the thin stripe. |
| Chroma color | The colour of the chroma key. If your clips contain a lot of green (#00ff00) use this parameter to choose a different chroma key colour. |
C:\Program Files\Shotcut\share\shotcut\qml\filters /usr/bin/shotcut/share/shotcut/qml/filters There are several ways of applying this filter.
Say you have a set of slides (static images) you want to turn into a slideshow and say that each slide shows on the screen for 4 seconds, then the JRtransition takes a further 2 seconds to create a seamless transition into the next slide (as shown in the schematic below).
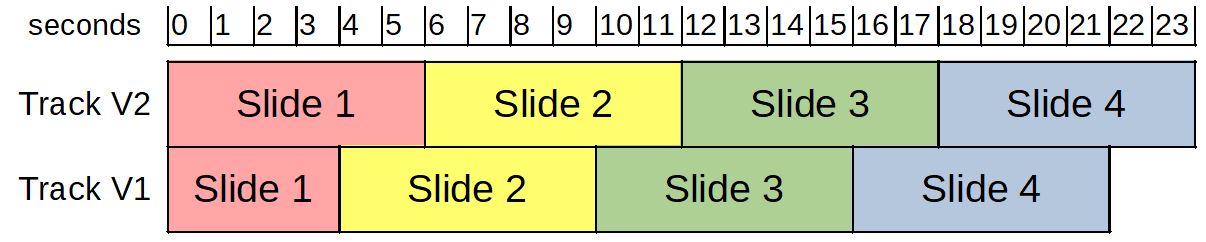
You would do the following:
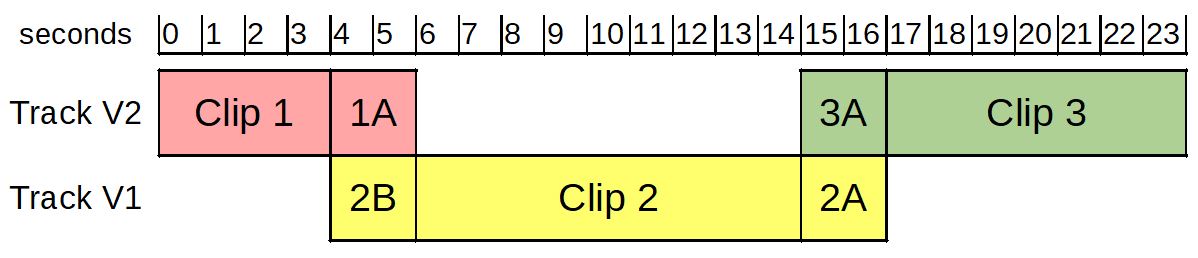
Say instead you have 3 clips of non-static video footage of various lengths and you want to have the JRtransition between clips 1 and 2 and between clips 2 and 3 (as shown in the schematic below).

You would do the following:
However, when you apply the JRtransition filter to the beginning of a track on V2, such as 3A, you must reverse the direction of the chroma key by selecting the "reverse" option.
If you are using a version of Shotcut prior to version 19.06.15 the above procedure will almost give the correct effect, but there will be a slight problem with transparency. There were changes to the use of the alphachannel with transparency at that level of Shotcut and above. For versions prior to this one you have to include a few more steps:
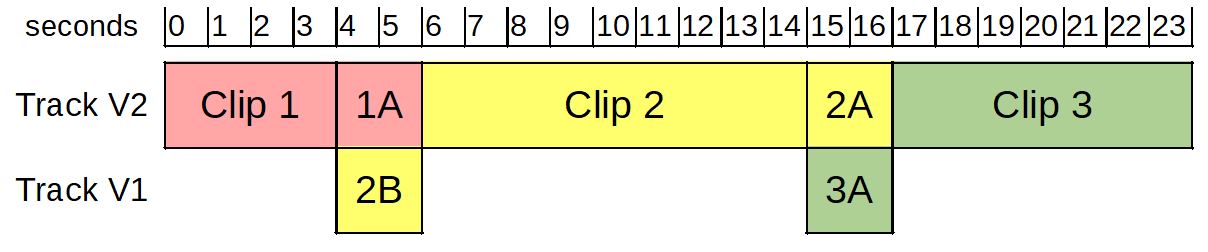
As shown in the schematic below. Again you will have to select the "reverse" option if the filter is applied to the beginning of a track on V2.
There have been some problems reported with "glitches" that occur when using the above mentioned procedure for
motion (video clips). This may be related to "reversing" the chroma key.
If this is the case for you you can use another method which is shown pictorially below. You do the following:
This problem has now been fixed, but the procedure below is still a valid one.
Don't forget, if you are customising the filter (e.g. setting a different color for the stripe or a diiferent angle) you can save these as a new preset. That way you won't have to keep changing these values each time you apply the filter.
